Welcome to Matrix Education
To ensure we are showing you the most relevant content, please select your location below.
Select a year to see courses
Select a year to see available courses
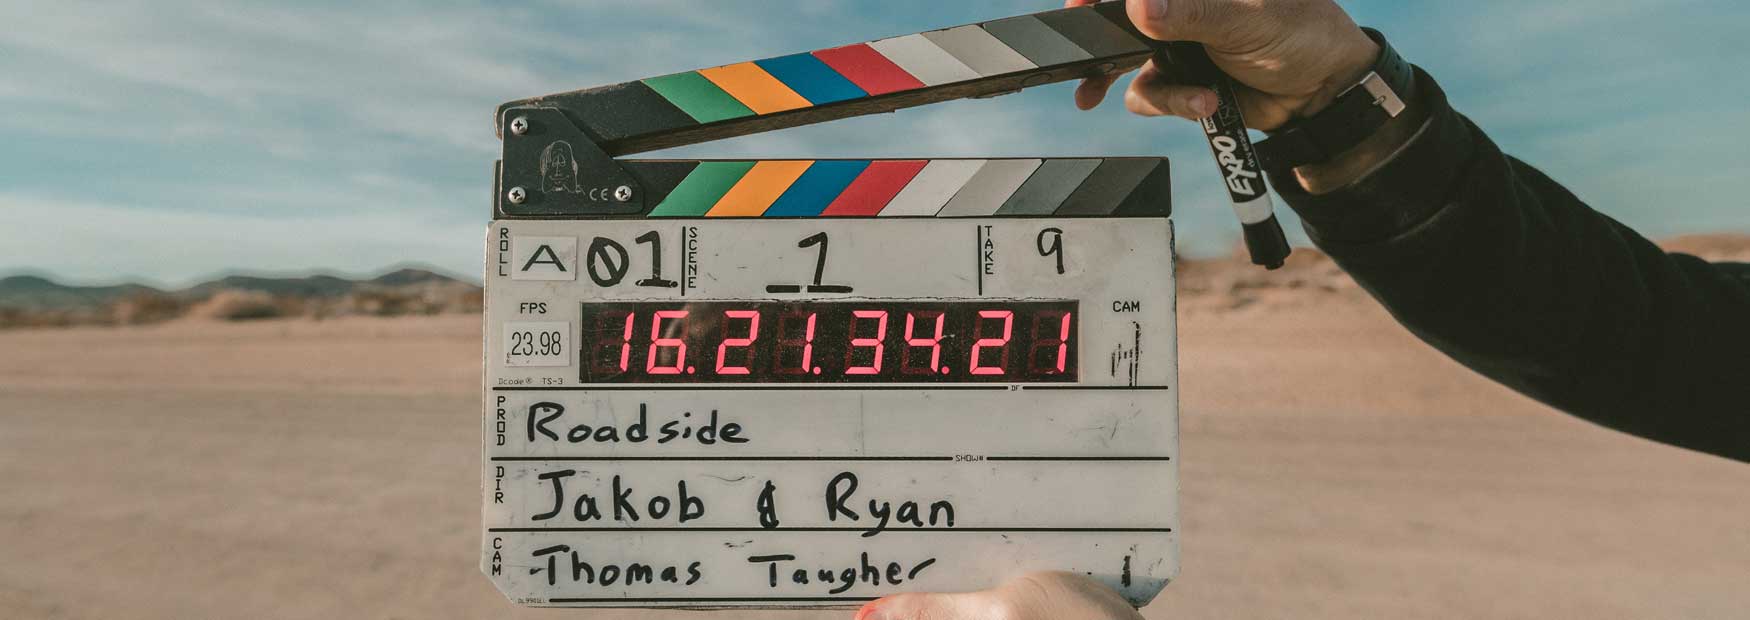
Have you been set a video essay for English and don't know where to start? You're not alone. In this post, we give you the tools to impress with your next video essay.

Join 75,893 students who already have a head start.
"*" indicates required fields

Join 8000+ students each term who already have a head start on their school academic journey.
So, you’ve been set a video essay as an assessment task. But what does that mean, exactly?
In this post, we’re going to give you the ultimate video essay checklist complete with examples, step-by-step processes, and links to really useful online tools and resources to help you ace your next video essay.
You need to check off the following 10 items to produce a head-turning video essay:
In this post, we’ll give you detailed advice for each question above. But before we work through this video editing checklist, we need to make sure you understand what a video essay is by answering some common questions.
A video essay is a video, or in some instances a multimedia text, that presents an argument or discursively explores an idea or thing. Unlike written essays, video essays combine written and oral arguments with film, sound, and images.
Video essays are a relatively new genre of visual essay. They are usually about 4 or 5 minutes long and either give a broad introduction to a subject or focus one specific idea.
In video essays, authors narrate a video which advances their argument. This is laid on top of a series of visuals – still image, video clips, video of the creator – so that all these components combine together to advance the argument.
As a form of information, video essays are engaging and accessible. They tend to avoid jargon and unnecessary meta-language as they are produced for a wide viewership.

The new 2019 English Syllabus introduced a mandatory assessment – the multimodal presentation.
Multimodal presentations require students to give an oral presentation that also includes a visual element – such as a PowerPoint presentation or other set of slides, or a poster.
Video essay assessments mean that students need to bring several different skill sets together:
In addition, one of the best tools for learning is to educate others. if you want to check your knowledge on a subject or idea, you should try and teach others. A video essay is a means of doing this.

Before you start trying to produce your own video essay, you should take a look at some examples of other high-quality essays.
Get ahead of your peers with Year 11 English Term Course. With advanced completion of contents before it’s taught at school, you’ll be better prepared for your school assessments. Learn more about Matrix’s Year 11 English Term Course.
Where can I find examples of video essays?
Video essays have become an increasingly popular way of communicating information about a topic.
YouTube is full of video essay channels. Some are long, others are quite short. Because your school task will only be a few minutes, we’ll focus on the shorter ones.
Here’s a short list of good video essay channels with a brief description of what they produce videos about:
There are many more channels that you can find covering everything from baking and knitting to political economy and video games.
Before you start putting your essay together, you should watch a wide selection of video essays on topics that you are interested in or are relevant to your studies. This will allow you to see how they are structured and paced.
Now you know what you’re trying to produce, you need to think about the tools you’ll need.

Video essays will obviously require more tools than a pen and paper. Let’s have a look at the equipment and software tools and apps you’ll need to make one.
First, here’s a list of equipment you will need or will find useful to make a video essay.
Now we need to look at the software available for you to use. You will need some kind of video editor, the rest are suggestions to add pizzaz to your video.
You need to check off the following 10 items to produce a head-turning video essay:
As you can see, there are three stages to this process: planning, drafting, and production. When you are producing something like a video essay that has many moving parts it is really important that you take the time to plan things in full and draft things thoroughly.
You don’t want to be re-editing or rerecording audio when you are time poor and stressed!
So, now you know what you need to do. Let’s show you how to do it!
The first step of any large project is to plan it. Producing a video essay requires a fair bit of planning. Here’s what you need to think about:
As you can see, a video essay might sound different and fun – and it is – but it is also a fair bit of work.
Before you do anything else, you need to decide on what you will discuss in response to your Assessment Notification. To help you understand how to approach this, let’s take a quick look at a sample notification:
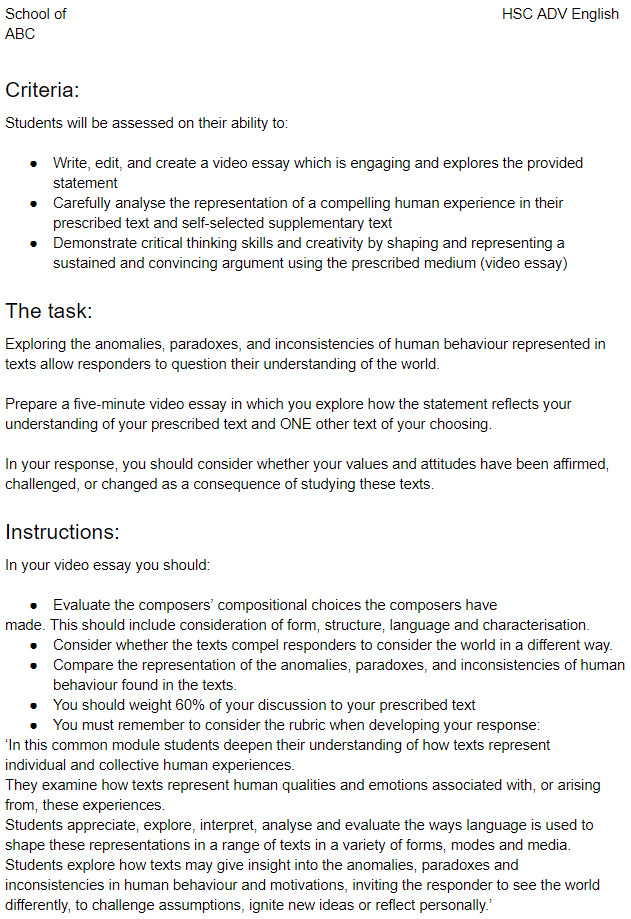
If you were responding to the sample notification above, you’d want to unpack this statement:
Exploring the anomalies, paradoxes, and inconsistencies of human behaviour represented in texts allow responders to question their understanding of the world.
You will need to consider which “anomalies, paradoxes, and inconsistencies of human behaviour” are best reflected in your text.
To do this, you will need to have a thorough understanding of your text and the Common Module: Texts and Human Experiences rubric statements. If you haven’t already, you should check out Part 1 of our English Advanced Study Guide – Common Module: Texts and Human Experiences.
Once you know what topic you are going to discuss, you’ll need to decide what your argument will be. To do this, you’ll need to think about whether you agree or disagree with the provided statement.
You’ll need to support this with the content of your video essay.
You’ll need to plan out what you want to include in the video essay. This will include what ideas or points you will need to make to support your argument.
You’ll only have 3-5 minutes for your video. This means you’ll want to focus one or two points that support your overall thesis.
You’ll need to think about what visual elements you can use to make your points and make your video engaging for your viewers.
This might include:
Your video essay needn’t be restricted to you narrating your speech over the video. You can add depth and excitement to your video essay by utilising appropriate audio features.
These could include:
Before you can write your draft script, you need to organise the examples and other pieces of evidence that you may need.
This should be relatively straightforward once you’ve analysed your texts.
Well, that depends on the length of your speech.
You want to aim to deliver your speech at around 130 words per minute. So, If you have a four-minute speech, you want to aim for 520 words.
That’s not much, is it?
You probably only want to discuss four examples, at most. That gives you 100 words to unpack and analyse each of the examples and connect them to the main idea of your video.
As you have very little time, you want to aim for detail and specificity. This means that you want to have good examples that pack in a lot of meaning.
You need two ask yourself two questions when you’re deciding on which examples to include:
Remember, the important thing with short presentations is to make a consistent argument about your thesis and unpack a few examples in detail to support it. If you keep this in mind, it will help you select the right examples to use.
Before you write a script, you need to plan out what you will talk about and when. It will help you to create a storyboard.
A storyboard is a visualisation of the order of scenes that you will present on film. When you plan an essay, you note down what your argument will be, what order you will use to discuss your themes, and you plan out your examples.
A storyboard does the same thing for a visual text. Designing a storyboard will help you visualise the order of the shots that you need to make a convincing and well-structured essay.
Here’s a sample storyboard for a video essay on Nineteen Eighty-Four and Terry Gilliam’s film Brazil:
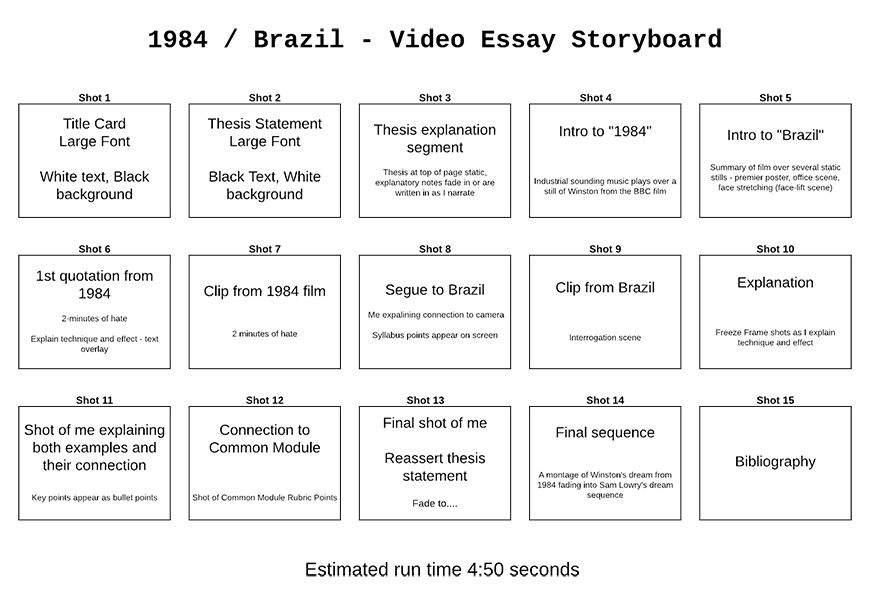
You plan a storyboard the same way you plan an essay:
You can draw a storyboard by hand. If you want the flexibility of dragging things around and re-organising things in case you need to restructure it, you could use a flowchart program like Lucidchart (this is what we used to create the simple storyboard above).
Once you’ve planned things out, you’re in a position to draft your script.
There are a lot of similarities between writing a speech and a video essay script:
You also need to take into account any audio or video clips and text slides that you present. It is important that you plan to pause your speech when you show clips or present pieces of text. The silence will help your audience take on board and process the information you’ve given them.
If you’re unsure how to write a speech or are looking for some specific tips, check out our blog article How to Ace Oral Presentations and part 10 of the Beginner’s Guide to Acing HSC English: How to Prepare a Multimodal Presentation.
Once you have drafted a script, you’re in a position to compile all the clips and images you’ll need for the video.
When you create a video essay, it is important that you include visual elements to help support your argument.
Here’s what you should consider including in your video essay:
Once you’ve sourced or created all of the visual and audio tools that you may need, you’re ready to produce the second draft of the script.

Drafting and editing are habits you must establish in Year 12. Or even better, earlier! Editing and drafting will give you the opportunity to refine the works that you have already produced.
The best way to edit a script is to read it aloud!
1. Set up a recording device – use your phone or laptop – and record yourself reading the script.
2. Make notes or annotate any parts of your script where you stumble over words or the sentences sound weird. This is possibly your ear picking up on grammatical mistakes or unidiomatic sentences.
3. Listen to the recording and read along with yourself narrating the script. Pay attention for sentences that sound incorrect and parts of your argument where you don’t develop your ideas or gloss over important information. It is also important that you don’t get sidetracked and include information that your audience doesn’t need. Remember, just because you find it really interesting, doesn’t mean that it is relevant to your audience.
4. Match your draft to your earlier story-board. It’s okay to change up the order of things, but if you edit the structure of the script, update your storyboard, too.
Ask yourself the following questions:
Once you’ve edited the script, you’re ready to write the second draft of your script.
Make sure that you write the second draft from scratch. It’s really tempting to take the original document and replace some sentences and drag other ones around. But that isn’t going to allow you to make big changes.
Writing the 2nd draft in a blank document or handwriting it out in full gives you the opportunity to make large changes – you will be more willing to cut out parts that don’t work or rewrite them rather than trying to make parts of an argument that don’t work, work.
To write a second draft effectively:
Editing is an ongoing process. It can often take many iterations to get a script right. Rehearsing your script a few times is a good way to continue polishing your script.
Rather than rehearsing a script in front of a mirror or to an empty room, do it in front of an audience and record it. You can record the video or just the audio. It doesn’t need to be a high-quality recording. Just something that you can use to evaluate what works and what doesn’t work in your script.
After you’ve rehearsed your script in front of an audience, ask them for some feedback:
Finally, ask them if they can summarise your argument. This will tell you how well you have presented your ideas to an audience. Make sure you write down this feedback.
Now, listen to your recording and read through your again, like when you edited the first draft. This time, also consult the feedback notes you received from your rehearsal audiences. Make sure you mark up the parts of the script that your audience felt could be improved.
Use these annotations to write your final script.
Give your final script a rehearsal or two. Make sure that it comes in at the correct length. Check it against your storyboard again and update the storyboard if you need to.
You’re now ready to record your audio and/or video.
If you’re recording an audio track, you’ll want to make sure that:
If you’re recording video, you will want to check the following:
Make sure you set aside plenty of time to record audio and video. It will likely take much longer than you have planned. You must be prepared to troubleshoot things as they occur.
The final step is where you bring all of the elements together. Producing a video may well prove to be a little bit finicky as you edit things down to the correct length. You will need to work precisely to the second as you pair up the audio with the visual elements.
The simplest approach is as follows:
Now you’re ready to submit!
Good luck!
Written by Matrix English Team
The Matrix English Team are tutors and teachers with a passion for English and writing, and a dedication to seeing Matrix Students achieving their academic goals.© Matrix Education and www.matrix.edu.au, 2025. Unauthorised use and/or duplication of this material without express and written permission from this site’s author and/or owner is strictly prohibited. Excerpts and links may be used, provided that full and clear credit is given to Matrix Education and www.matrix.edu.au with appropriate and specific direction to the original content.