Welcome to Matrix Education
To ensure we are showing you the most relevant content, please select your location below.
Select a year to see courses
Select a year to see available courses

As soon as you mention public speaking, you can already hear the chorus of groaning students. Students hate learning how to write speeches and presentations in Year 10 because they’re afraid of presenting and making a fool out of themselves.
But they shouldn’t be. You need to realise that public speaking is just like any other skill!
With more practice, you will become more confident and get better at it!
The secret to acing your speeches and presentations in Year 10 is proper preparation and practice. So, let’s see what that involves.
Okay, so what’s the difference between a presentation and a speech?
Well, a presentation is basically a speech with VISUAL AIDS. You may find that you need to draw, create a powerpoint, or make a poster.
So, when you are asked to do a presentation, you are being assessed on these 3 things:
This might seem a little daunting, but don’t fear! We broke down the process into manageable steps that will help you learn how to write speeches and presentations in Year 10 and ace your presentations!

However, before we start going through these steps in detail, let’s see what visual aids are.
Too often, students use visual representations are too literal…
For example, using a screenshot of the Harry Potter movie in your PowerPoint when you are analysing Harry Potter in your speech!
This is NOT a good visual representation
A visual representation is anything visual that represents IDEAS and THEMES.
They enhance the content of your speeches in a METAPHORICAL or FIGURATIVE way.
Essentially, visual representations use symbols, or metaphorical images to convey the ideas that you explore in your speeches.
A visual representation is supposed to make your audience think more deeply about the content of your speech.
For example, if your speech explores human’s innate selfishness… you can draw a half-human face and half-monster face.
Remember, they do NOT need to be artworks!
You are not being assessed on how pretty or technical your visual representations are. You are being assessed on how well it conveys the ideas and meanings in your speech.

There are various types of visual representations that you can make. So, obviously, there are many different tools you can use.
Some software programs you can use are:
Here are some free tools you can find on the internet:
OR, you can go traditional and do a hand-drawn visual representation. Get out your colour pencils, textas and highlighters!
Remember, you are being assessed on the conceptual ideas not whether you are the next Khalo or Manet.
Now, that you know about the different tools you can use to make your visual representation, let’s see what types of visual aid you might want to (or need to) create.
Remember, when you learn how to write speeches and presentations in Year 10, you can be asked to produce a variety of visual representations.
It is important that you know what they are and how to use each of them effectively.
These are one of the most common visual representations. These are slides made up of images and some text!
Your presentation slides should slowly progress through your central idea.
It is always a good idea to use strong and evocative images, rather than using only text.
You don’t want your audience to stop listening to your speech and start reading the words on your slide.
Your slides are supposed to be secondary to your speech!
Here are some tips to create great slides, PowerPoints and Prezis!

A poster is a page that conveys an idea. Posters usually include visual images and some text. However, they can also be completely visual.
Remember, the people sitting at the back of your class need to be able to see your poster!
So, it is a good idea to make it big, visible, and use a limited number of words.
Some tips to make effective posters:

Infographics are basically a graphic representation of information, knowledge or data. Infographics a series of visual images, charts, diagrams and minimal text.
They are meant to break down complex ideas and subjects and present them in a simple and visually appealing manner.
So, how do you create awesome infographics?
You make a short film of different scenes and screenshots from films and documentaries!
This is not commonly done. However, it can be an effective way to represent your ideas and themes.
Here is how you can do it:
Now that you know about different types of visual representations, let’s see how to write speeches and presentations in Year 10.

Remember, speeches are NOT essays.
They are written to be spoken. So, they must be concise, engaging AND, above all, informative.
Let’s see what you need to do.
Slicing a big job down into smaller chunks will make it easier and the end result better.
At Matrix, students are taught the Matrix Method when writing English responses.
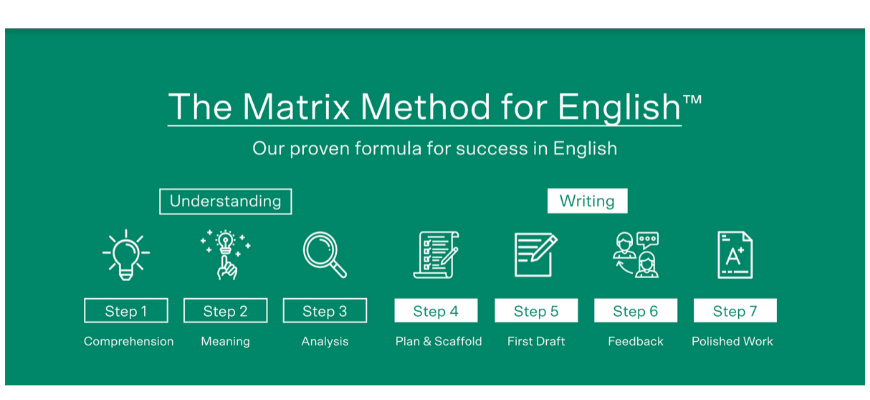
When you are learning how to write speeches and presentations in Year 10, you will need to go through these steps too.
Steps 1 – 3 are about building a strong understanding of the text you have to analyse.
After you have done this, it is then time to…
Planning your speech is an integral step to great presentations.

As Benjamin Franklin said,
“By failing to prepare, you are preparing to fail.”
So, how exactly do we plan speeches and presentations?
Let’s quickly recap this now (you can find a detailed explanation of these steps in this part of our How to Write Speeches and Presentations in Year 9 Article)
Get the ball rolling in your mind and start writing down everything you know about your question/topic/subject.
Don’t be picky. Just write!
Research about the question/topic/subject to get a better general understanding of it.
If you are analysing a text, go over your text again. Identify the main themes and techniques.
Take note of everything!
Now that you have a better understanding of the question/topic/subject, you have to create an argument.
Take a stance. State your perspective.
Pick something that interests you, not what you think the teacher wants to hear. This way, you will seem more engaging when you are presenting it.
Once you figure out your thesis, you need to decide upon your ‘arguments’.
Remember, it is not an essay. So, you don’t need to have 3 arguments and write 3 body paragraphs.
You will only have a limited length. A good speech is spoken at 130 words per minute. So a 4-minute speech will be 520 words or less!
This means you need to select ideas that flow from each other and build off one another. This will ensure that your speech progresses in a storytelling manner.

Speeches need to be engaging. So, most speeches structure their information in a storytelling format.
Here is a common structure that you can use for your speeches:
Now, you need to select your evidence!
You should already have notes with some evidence or techniques. Refer to these to pick out the strongest and most relevant evidence to support your arguments!
If you don’t have notes, then it is time to look for evidence.
To do this, you need to either do some research and/or look through your text again.
Before you start drawing or producing your slides, you need to plan it out first!
Planning will help you create stronger visual representations because you already thought about how it can enhance the content of your speech.
Here is how you can do this:

Now, that you have a rough plan of your visual representation, it is time to create it!
We already considered some tools that you can use to make visual representations above and how to create different forms of creative visual representations above.
So, here are some general tips to help you create your visual representations:
There are many different ways to create a visual representation! You are only limited by your imagination and technology.
Once you have finished putting together your visual representation, you are now ready to write your speech!

Speeches are NOT essays! So, you shouldn’t write them like essays.
We explored How to Write Speeches and Presentations in detail in our Year 9 Article.
But, let’s quickly summarise some of the main points to refresh your memory:
Too often, students forget to make links between their visual representation and speeches. This will make their speech and visual representation seem like two separate assessment tasks.
But they’re not!
Your visual representation is meant to enhance the content of your speech.
It is supposed to give more information to the audience – in a metaphorical way – to help engage them, and challenge them to think deeply about the content of your speech.

So, when you are writing your speech, you have to consciously refer to your visual representations.
For example, let’s say that you made a poster about a boy painting the globe to represent how an individual has the ability to view things in a new perspective and change their life.
You can make implicit references to your visual representation by saying things like “You have the chance to repaint your own world and make a change.”
OR
You can be more explicit, and say “As you can see here (point to your poster), change is all about perspective. The boy painting over the globe represents how his perspective of his world has changed…”
As you can see, there are many different ways to make references to your visual representations. You can do it implicitly or explicitly. Just remember to do it!
Speeches are not engaging if you don’t use persuasive devices and rhetorical techniques!
This is what makes speeches different from essays!
Here are some common rhetorical devices and techniques that you can use:
| Technique | Description | Example |
| Alliteration | Repetition of the first letter/sound of a word | Annie ate an apple |
| Anaphora | Repetition of a word/phrase at the beginning of a sentence | We need to do open our eyes. We need to take action. |
| Anecdote | Short recount/story | Last Christmas, at my family reunion… |
| Emotive language | Selectively chosen words that evoke an emotional response | The desert was deadly hot. |
| Ethos | Showing authority and credibility for arguments raised | I worked at Google for 3 years… |
| High modality words | Words indicating high certainty | Must, have, certainly, need… |
| Humour | Something funny | They asked me to give them a break. I gave them a KitKat. |
| Logos | Using logic to support arguments eg. facts and statistics | According to the Australian Bureau of Statistics… |
| Metaphor | Comparing two subjects by saying on IS the other | The dog’s teeth were knife sharp. |
| Pronouns | Words that replace nouns | We, I, us, them… |
| Puns | Play on words; words with similar sounds but have different meanings | You cooked some EGGscellent eggs. |
| Repetition | Repeating words or phrases | Go. Go. Go! |
| Sarcasm | Saying one thing but meaning the opposite | Can you walk any slower? |
Remember, you can always go back and insert more techniques when you are editing your speeches.
Remember, getting feedback is an integral step to writing speeches and presentations.

When you ask for feedback you are able to:
So, how do we seek feedback?
Remember, it is ultimately your choice to decide whether or not you want to take on the feedback. Sometimes, it doesn’t align with your goals, so it is okay to not take it aboard.
Remember, your speaking and presentation skills are also being assessed!
It is important that you practice and rehearse because it will help you:
So, here are some tips that will help you rehearse and practice!

After you’ve memorised and rehearsed your presentation, it is time to perform!
However, you might find that you still have some nerves and anxiety before your performance,
Don’t fear. Read the next section to see how you can manage your nerves and anxieties before your presentation.
There aren’t any magic pills to make you completely fearless when it comes to public speaking. Everyone – even Barack Obama – gets nervous before they speak in front of an audience.
But that’s the secret. Public speaking is about turning your nerves into energy!
So, how do we become more confident?
Before you speak, picture yourself presenting confidently in front of the crowd. Now, embody it.
Do you still have some nerves you need to calm down before your presentation?
Don’t worry! Take a few deep breaths before you begin.
Remember, breathe in through your nose and let the air fill your stomach. Then slowly let it out through your mouth. And repeat!
No one knows about your beating heart and sweaty palms. So, fake it ’till you make it!
Clear and strong voice. Good posture. Hand gestures!
Did you know smiling makes you feel more relaxed? It will also make you seem more confident.

No-one in the audience knows your speech word-for-word.
So, if you make a mistake, take a deep breath and continue like nothing happened!
Pay attention to people who are nodding and/or smiling when you present.
They will make you feel more confident about your presentation.
Remember, practice makes perfect! Over time, you will become a better public speaker and be more confident.
We considered some of these steps in detail in our How to Write Speeches and Presentations in Year 9.
You might hate speeches, but knowing how to write speeches and presentations in Year 10 and building your confidence is very important.
What are the benefits of public speaking?
As you gain confidence with your public speaking, you begin to transfer this confidence into everyday life.
When you write speeches, you need to convey your message in the most effective way through words. When you present, you need to do this with your voice.
These skills will help you speak and communicate your ideas effectively in everyday life situations!
You figure out ways to calm your nerves… like deep breaths, positive self-talk or a jittery dance.
These are methods that you can apply to stressful situations in everyday life.
© Matrix Education and www.matrix.edu.au, 2025. Unauthorised use and/or duplication of this material without express and written permission from this site’s author and/or owner is strictly prohibited. Excerpts and links may be used, provided that full and clear credit is given to Matrix Education and www.matrix.edu.au with appropriate and specific direction to the original content.